
“Complete wet room build. So glad I chose Deyan to do this for us. Within an hour of texting him he’d got back to me and arranged a time to come and have a look at the job. He turned up when we agreed and advised me as to what could be done. Totally honest and transparent about what needed to be done; timescales and how much it would cost. Got him booked in immediately. Left Deyan to design and order everything to what he thought would look/work best and it was a million-times better than I expected. Turned up and work began work when he said with plenty of communication prior too; which was reassuring. He worked incredibly hard on his own and adapted to the various challenges that he was provided with by a 1960’s extension on a 1938 property. Clean and tidy, clearing up at the end of each day. Flexible with us when we had a few issues here, and never let us down. The bloke is a total perfectionist; a grafter and a really nice guy. It was a big job which I was anxious about but to anybody in the same situation I would completely recommend Deyan.”
Wet Room Installation Yarm with Level-Access Shower
What the customer said
Transcribed word-for-word from our public profiles
Watch the project
Project in 30 seconds
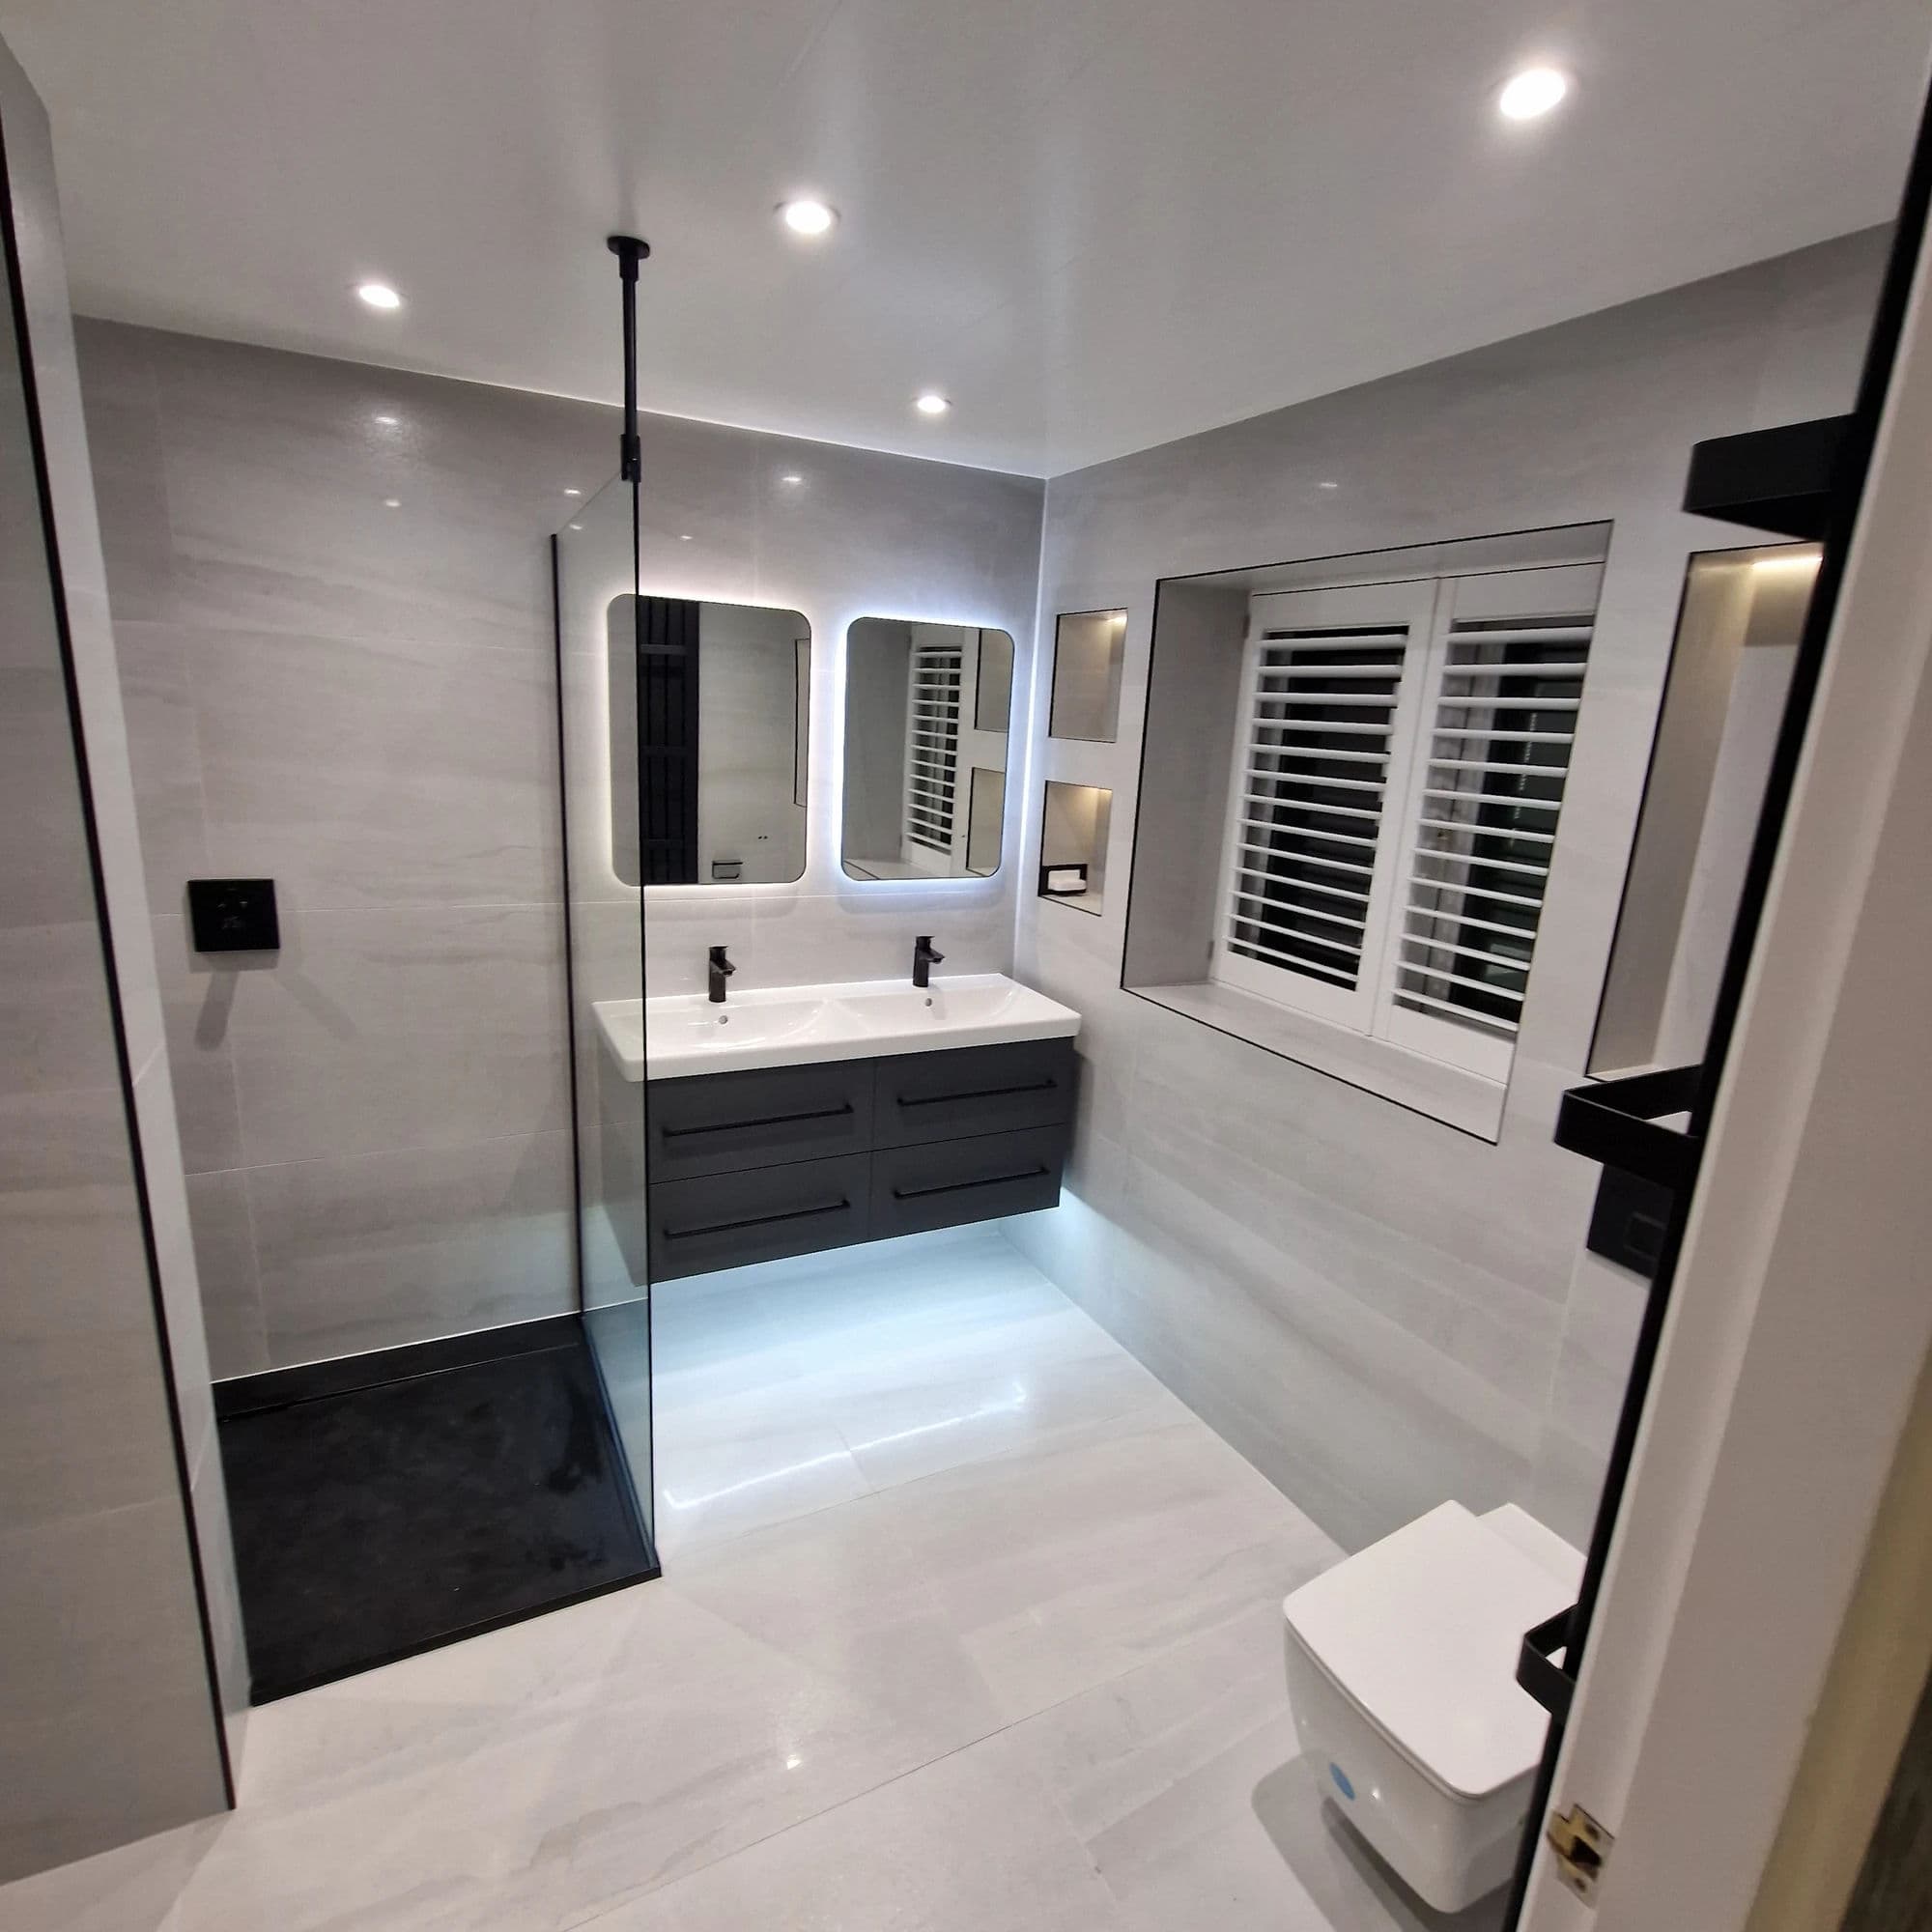
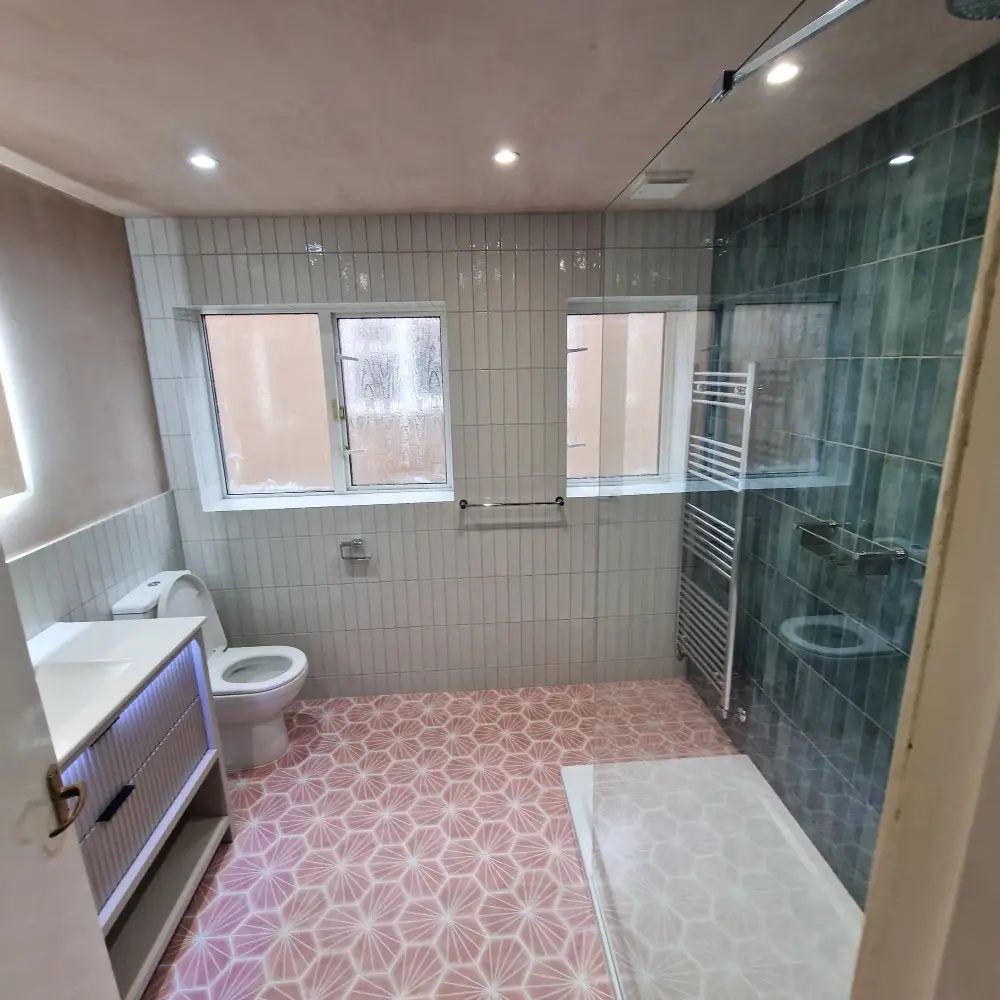
Completed in October 2026, this wet room installation in Yarm transformed a ground-floor utility room with an existing toilet into a complete wet room with an open, level-access tiled shower.
The room had never contained a shower and had no existing shower drainage. The homeowner had previously been told that creating a wet room would be impossible or involve substantial expense.
We installed new drainage through the concrete floor and external wall, rerouted the plumbing through the ceiling, replaced the ceiling, installed new ventilation and completed the room with 1200 × 600 mm porcelain tiling.
Most importantly, we achieved the necessary shower-floor falls without excavating the entire concrete floor or making envelope cuts in the tiles.
The project was completed in 10 working days.
The Customer's Requirements
When we first visited the property in Yarm, the homeowner explained that he wanted a proper ground-floor wet room with a large, open shower entrance.
Accessibility was an important part of the brief. The shower needed to allow someone to enter comfortably, with assistance if necessary, rather than having to step into a conventional raised shower tray or enclosed cubicle.
The homeowner had already spoken to several tradespeople about the proposed conversion. Some had advised that creating a wet room in the existing space was not possible, while others had suggested considerably more expensive solutions.
The main concern was whether the room could realistically be converted at all.
After inspecting the existing construction and drainage arrangements, we established a practical approach that would allow the installation to proceed without unnecessarily removing and rebuilding the entire floor.
This was a genuine bathroom installation, involving new plumbing, drainage, electrical services, waterproofing, tiling and bathroom fittings. It was not simply a replacement of existing sanitaryware.
The Original Ground-Floor Room
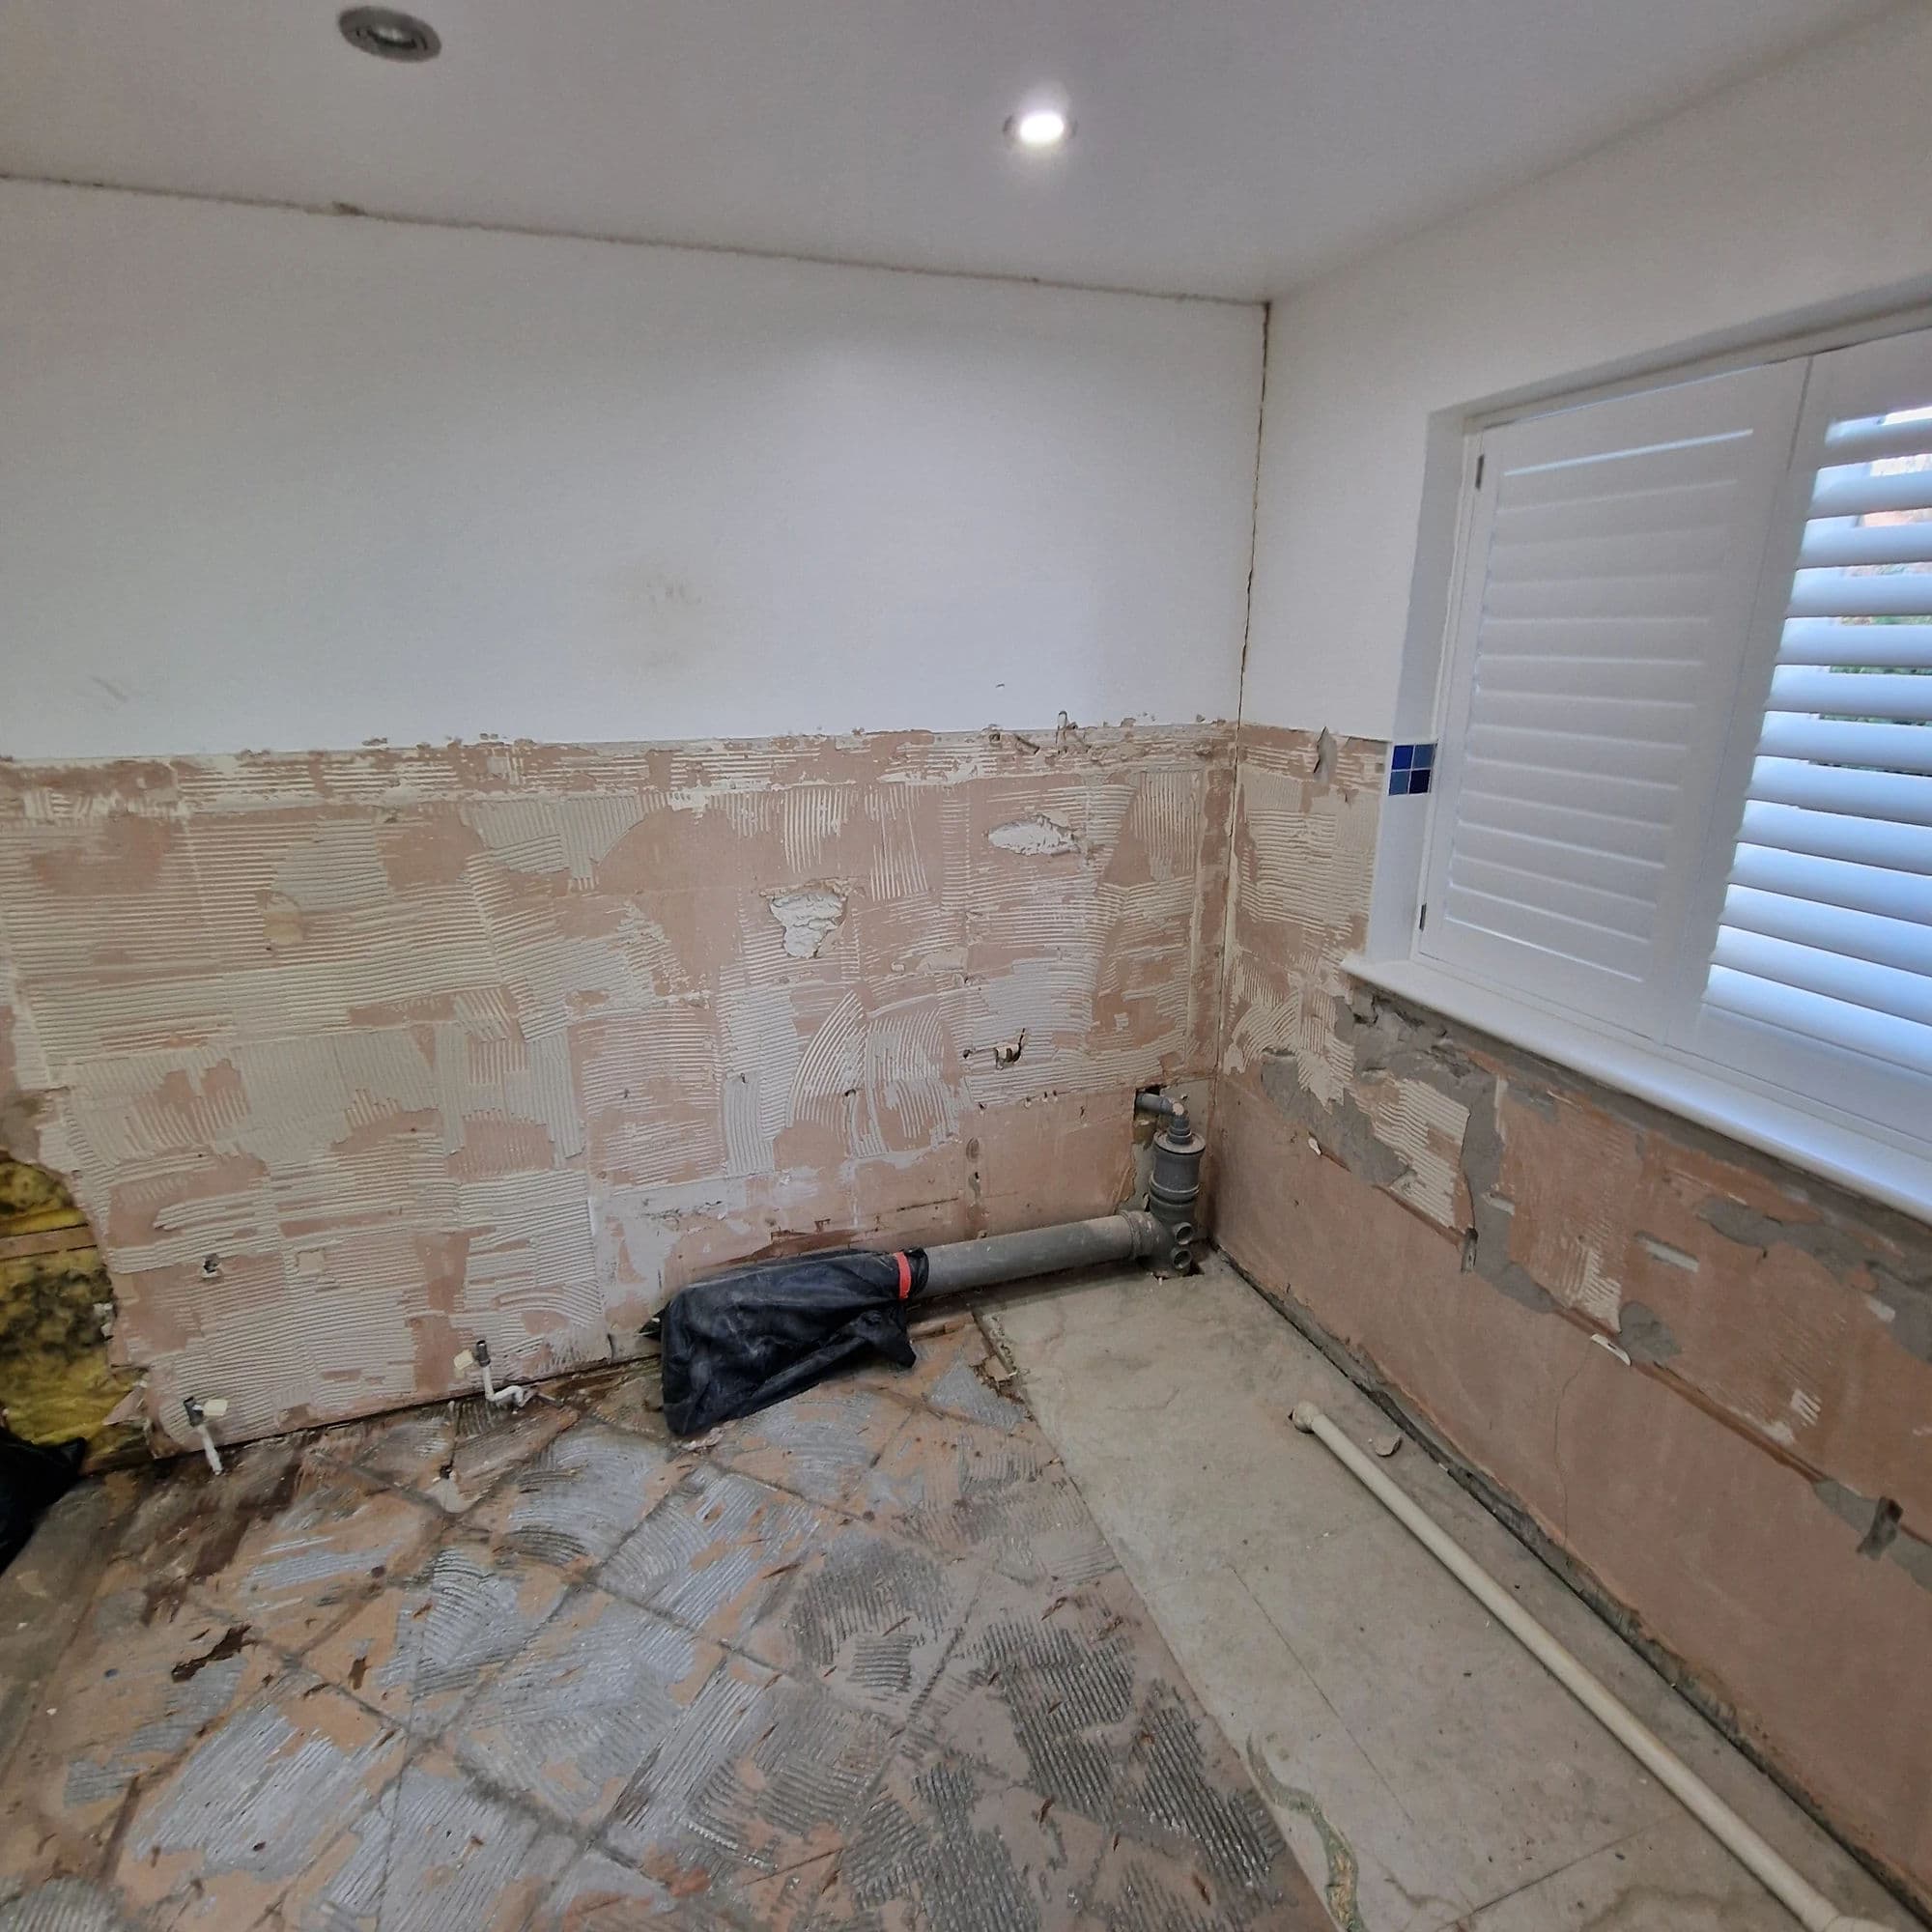
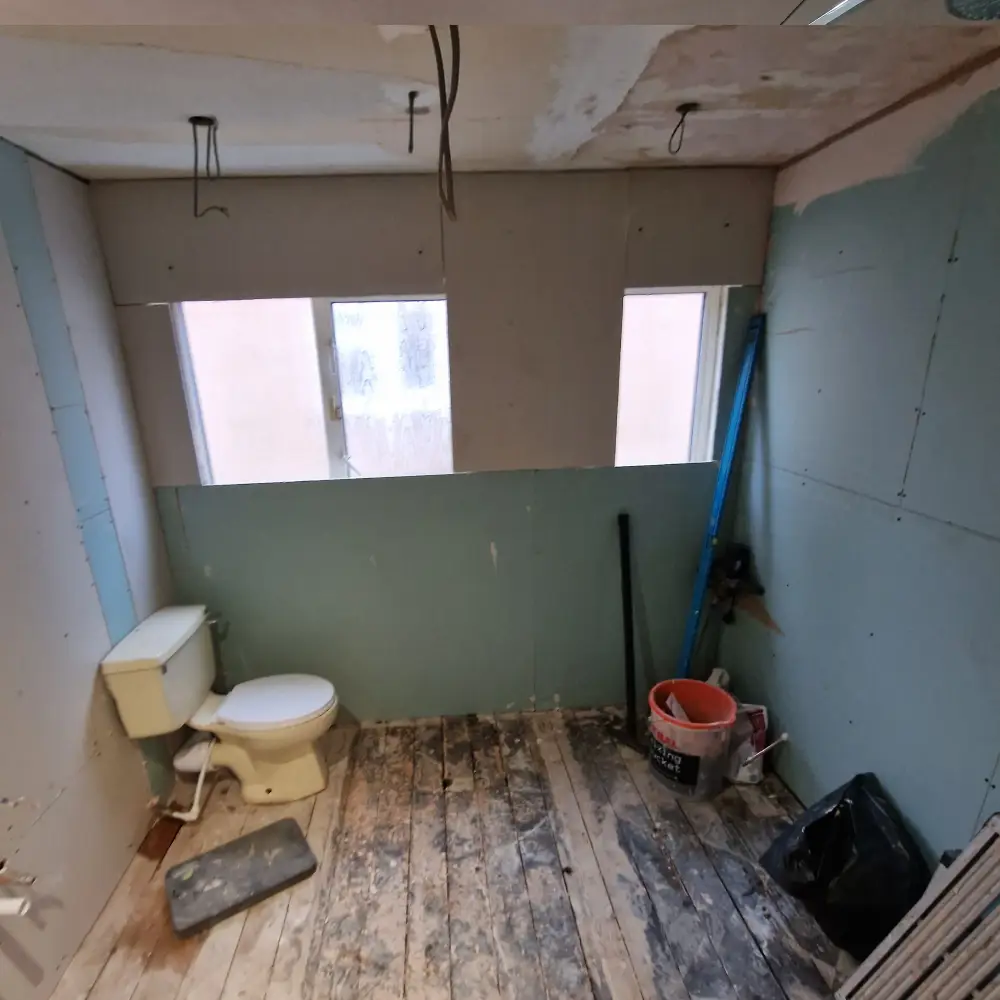
The property was an older house with a later extension, and the room had originally been used as a utility room containing a toilet.
It had never been fitted out as a bathroom or wet room.
There was no shower waste, no hot and cold water supply serving a shower, and no existing drainage arrangement for a tiled wet-room floor.
The original toilet was positioned in the corner, and the room had a concrete floor.
The ceiling was also in poor condition, with only a single light fitting and no suitable bathroom extraction arrangement.
Converting the room required much more than installing a shower and tiling the walls. New services needed to be introduced into an existing structure that had not originally been designed for this purpose.
Planning the Layout and 3D Bathroom Design
We prepared a 3D bathroom design showing how the proposed wet room would look and how the new fittings would be positioned.
The design centred on an open shower area with a fixed glass screen and a wide entrance.
The existing WC position was retained, with a floor-standing toilet and concealed cistern incorporated into the new arrangement.
A wall-hung vanity unit and washbasin were selected to keep the available floor space clear and give the room a more open appearance.
The proposed design was followed closely during installation. The only change to the original 3D visualisation was the colour of the walls above the tiling, which were finished in white rather than yellow.
The layout was planned around the actual space and the practical routes available for the new water supplies and waste connections.
Creating Shower Drainage Where None Existed
The new shower waste was one of the main technical challenges.
Because this had never been a bathroom, there was no existing shower drainage connection beneath the floor.
We broke out a channel through the concrete floor to accommodate the new waste pipework.
The external wall was then core-drilled to allow the pipe to pass outside and connect to the existing external drainage gully.
The new waste was positioned at floor level, and the excavated channel was reinstated with screed around the installed pipework.
This approach allowed us to introduce the necessary shower drainage without breaking out the entire concrete floor.
Removing and reconstructing the whole floor would have added considerable work, disruption and expense.
Instead, we concentrated the concrete excavation on the new drainage route and worked with the existing floor wherever possible.
Forming the Wet-Room Falls Without Envelope Cuts
This was one of the most technically satisfying parts of the installation.
The existing concrete floor already had a natural gradient. Rather than removing the whole floor to construct a new one, we used that gradient as the starting point for forming the shower falls.
During the floor tiling, we worked with four different sizes of notched trowel to control the adhesive bedding and establish the required falls towards the shower drain.
A wet-room floor needs to direct water towards the waste. Where large-format tiles are used, envelope cuts are often introduced to accommodate the changes in gradient.
On this particular installation, we achieved the necessary falls without envelope-cutting the 1200 × 600 mm porcelain floor tiles.
This allowed us to preserve the continuous appearance of the marble-effect tiling rather than dividing the floor into additional triangular sections.
Deyan's experience with traditional tiled wet rooms was particularly useful here. Having worked extensively with this type of bathroom construction in Bulgaria, where tiled shower floors with integrated drainage are common, he was familiar with forming falls without relying on a raised shower tray.
The finished floor demonstrates how practical tiling experience and careful planning can make a significant difference when converting an existing room.
New Water Supplies and Plumbing Alterations
The original room had none of the hot and cold water supplies needed for the proposed shower and basin.
We removed the existing ceiling plasterboard, which also needed replacing because of its condition.
With the ceiling opened up, we were able to route the new pipework through the ceiling void and down to the required positions.
The plumbing work included:
- New hot and cold water supplies for the shower.
- New hot and cold water supplies for the washbasin.
- New shower waste pipework through the concrete floor and external wall.
- New washbasin waste pipework, including additional core drilling.
- Removal of the original radiator pipework.
- New heating pipework for the relocated towel radiator.
- Routing the new supplies through the ceiling and down the walls.
- Final connections to the new bathroom fixtures.
Relocating the radiator required its existing pipework to be removed and new connections to be brought down the wall from above.
The original toilet position was retained, avoiding unnecessary alterations to the existing WC drainage.
Much of this plumbing is now concealed behind the finished surfaces and fittings, but it formed an important part of turning the utility room into a fully functioning bathroom.
Ceiling Replacement, Electrical Work and Ventilation
The ceiling was in poor condition and required replacement.
Removing the old plasterboard also provided access for the new plumbing and electrical preparation.
The electrical work was coordinated with an electrician, who installed the wiring for the recessed ceiling spotlights, extractor fan and associated controls, including the fan isolator.
We also core-drilled the external wall to accommodate the new extractor fan.
Once the plumbing and electrical first-fix work was complete, the ceiling was reboarded and plastered.
The walls above the tiled areas were plastered where required, followed by preparation and painting of the upper walls and ceiling in white.
This work provided the bathroom with updated lighting, mechanical ventilation and a completely renewed ceiling finish.
Wet-Room Waterproofing
A properly prepared waterproofing layer is particularly important where the shower is formed directly within the tiled floor.
Before waterproofing, we primed the relevant surfaces using Mapei Primer G, a water-based synthetic resin primer used to prepare absorbent backgrounds for subsequent finishing work.
The corners and relevant junctions were reinforced using Marmox Self-Adhesive Waterproof Tape.
This 100 mm wide sealing tape has a flexible butyl adhesive layer and a fleece backing, allowing it to be applied directly to the prepared junctions.
The wet areas were then tanked using ARDEX WPC W, a flexible, rapid-drying waterproof coating designed for internal wet-room applications.
The purpose of the waterproofing was to provide protection beneath the tiled finish, including the shower floor and the vulnerable junctions between adjoining surfaces.
The waterproofing preparation was photographed before the installation of the porcelain tiles.
This is an important part of a complete wet-room installation because the finished tiles and grout are not, by themselves, a substitute for proper waterproofing beneath the surface.
1200 × 600 mm Marble-Effect Porcelain Tiling
The room was finished using 1200 × 600 mm marble-effect porcelain tiles supplied by Verona.
The same tile design was used across the walls and floor, providing a consistent appearance throughout the room.
The shower area was tiled to ceiling height, while the remaining walls were tiled to approximately 1200 mm, with plastered and painted surfaces above.
The bathroom tiling required accurate setting out around the shower fittings, glass screen, concealed cistern boxing, basin, radiator connections and other service penetrations.
For fixing the porcelain tiles, we used Excel Bond Slow Set Flexible Grey S1 Adhesive, supplied by Topps Tiles.
This flexible cementitious adhesive is suitable for porcelain wall and floor tiling. Its standard-setting formulation provides working time for positioning and adjusting large-format tiles.
The completed tiling was grouted using BAL Micromax3 ECO White, a flexible grout classified as CG2 WA, with improved abrasion resistance and reduced water absorption.
Particular attention was given to the floor tiling, where the existing concrete construction and the required shower falls had to be considered together.
The ability to complete the floor without envelope cuts helped maintain the clean, continuous appearance of the large-format porcelain tiles.
Bathroom Fixtures and Final Installation
With the plumbing, preparation, waterproofing and tiling completed, we installed the new fixtures and completed the final fitting.
The finished wet room includes:
- An open, level-access tiled shower area.
- A fixed glass shower screen with a wide entrance.
- Black rainfall and handheld shower fittings.
- A floor-standing toilet with concealed cistern.
- A wall-hung vanity unit and washbasin.
- A circular LED illuminated mirror.
- A relocated heated towel radiator.
- New recessed ceiling spotlights.
- A new extractor fan and fan isolator.
- 1200 × 600 mm Verona-supplied marble-effect porcelain wall and floor tiles.
- Plastered and painted white upper walls and ceiling.
- Concealed water supplies and waste connections.
The open shower, continuous floor tiling and wall-hung basin furniture make the room feel considerably more spacious than the original utility-room arrangement.
Completing the Installation in Two Working Weeks
The entire project was completed over two working weeks, Monday to Friday, taking 10 working days from start to finish.
Within that programme, we carried out the concrete-floor drainage alterations, external core drilling, plumbing installation, ceiling replacement, electrical coordination, ventilation, waterproofing, large-format porcelain tiling, plastering, decorating and final fitting.
The property presented the usual difficulties associated with introducing modern bathroom services into an older building and later extension.
The work required the different stages to be carefully coordinated, particularly where the drainage and plumbing needed to be positioned before the floor and wall finishes could be completed.
The installation was finished without removing the entire concrete floor.
The Completed Wet Room
The completed bathroom bears very little resemblance to the original ground-floor utility room.
Where there had previously been only a toilet, there is now a complete wet room with an open tiled shower, washbasin, concealed-cistern WC, relocated heated towel radiator, improved lighting and new ventilation.
The homeowner was extremely pleased with the finished result and expressed his appreciation for the work involved. The bathroom exceeded his original expectations.
For us, the most important part of this installation was overcoming the practical challenge of creating a wet room in a room that had never been designed for one.
Introducing new drainage, working with the existing concrete floor, forming the shower falls without envelope cuts and coordinating the concealed plumbing were the key parts of the project.
Wet Room Installation and Bathroom Fitting in Yarm
This project shows that converting an existing downstairs room into a wet room is not always a straightforward installation, particularly where there is no shower drainage and the existing concrete floor presents restrictions.
The right approach depends on assessing the drainage, available floor levels, water supplies and construction before deciding how the wet room can be built.
Tees Valley Refurbishments Ltd specialises in wet room installation and complete bathroom installation, including drainage alterations, plumbing, waterproofing, bathroom tiling and final fitting as part of a complete bathroom project.
We carry out bathroom fitting and installation in Yarm and across Teesside, managing each project from the initial survey and planning through to the completed bathroom.
Homeowners considering a similar conversion can also explore our completed bathroom projects to see the different layouts, construction challenges and finishes we have worked with.
More bathrooms in Yarm
Want a bathroom like this?
Book a free bathroom survey — we'll visit, measure up and give you a detailed, fixed-price written quotation clearly setting out the agreed scope of work.
Book a Free Bathroom Survey